Google Analytics Tracking Code

Tuesday, August 30, 2011

Show & Share {3}


It's time to Show & Share! We had such a fabulous party last week. Thank you for joining us! I can't wait to see what you've been up to this week! Just a few simple guidlines when linking up:

*Follow me & my co-hosts Lindsay and Whitney
*Link to a specific post--not your home page, no giveaways, or no etsy shops
*Link something you've done in the last month
*Post our buttons on your blog so everyone can join in the fun
*Visit & comment on at least TWO other links posted
*Come back to see if you've been featured!

Enjoy!


Sunday, August 28, 2011

Show & Share 2 {Features}

I had blast at the Show & Share party last week! You my friends are amazing! I absolutely loved looking at all the great projects you've been working on! Such great ideas! Thank you to everyone that linked up! The best part of the blogging world is getting to know all of you! Here are some of my favorites from last week.

The most viewed link was from Ginger Snap Crafts.
What a cute way to display your jewelry! 


Check out this darling skirt from The Orchard in Bloom.
I want one of these in my closet! She designed this for a Shabby Apple contest...show her some love and vote for her and she's doing a giveaway for one!

Blissfully Ever After made these Restoration Hardware knockoff baskets.


 Check out these bathroom storage jars from Clean and Scentsible


I'm loving this Anthro Cardi knockoff from Bugaboo Mini, Mr and Me


This table from Forever Decorating turned out beautiful!


You know I'm LOVING grey and yellow right now and
I'm loving these pillows by The Tanner's - A little crafty-ness


 How fun would this liquid play dough from Kadydid Designs be?
My daughters would absolutely love this! It's a must do before summer ends!

Would you believe that these adorable bracelets from The Letter 4 
are made from Popsicle sticks? So cute!
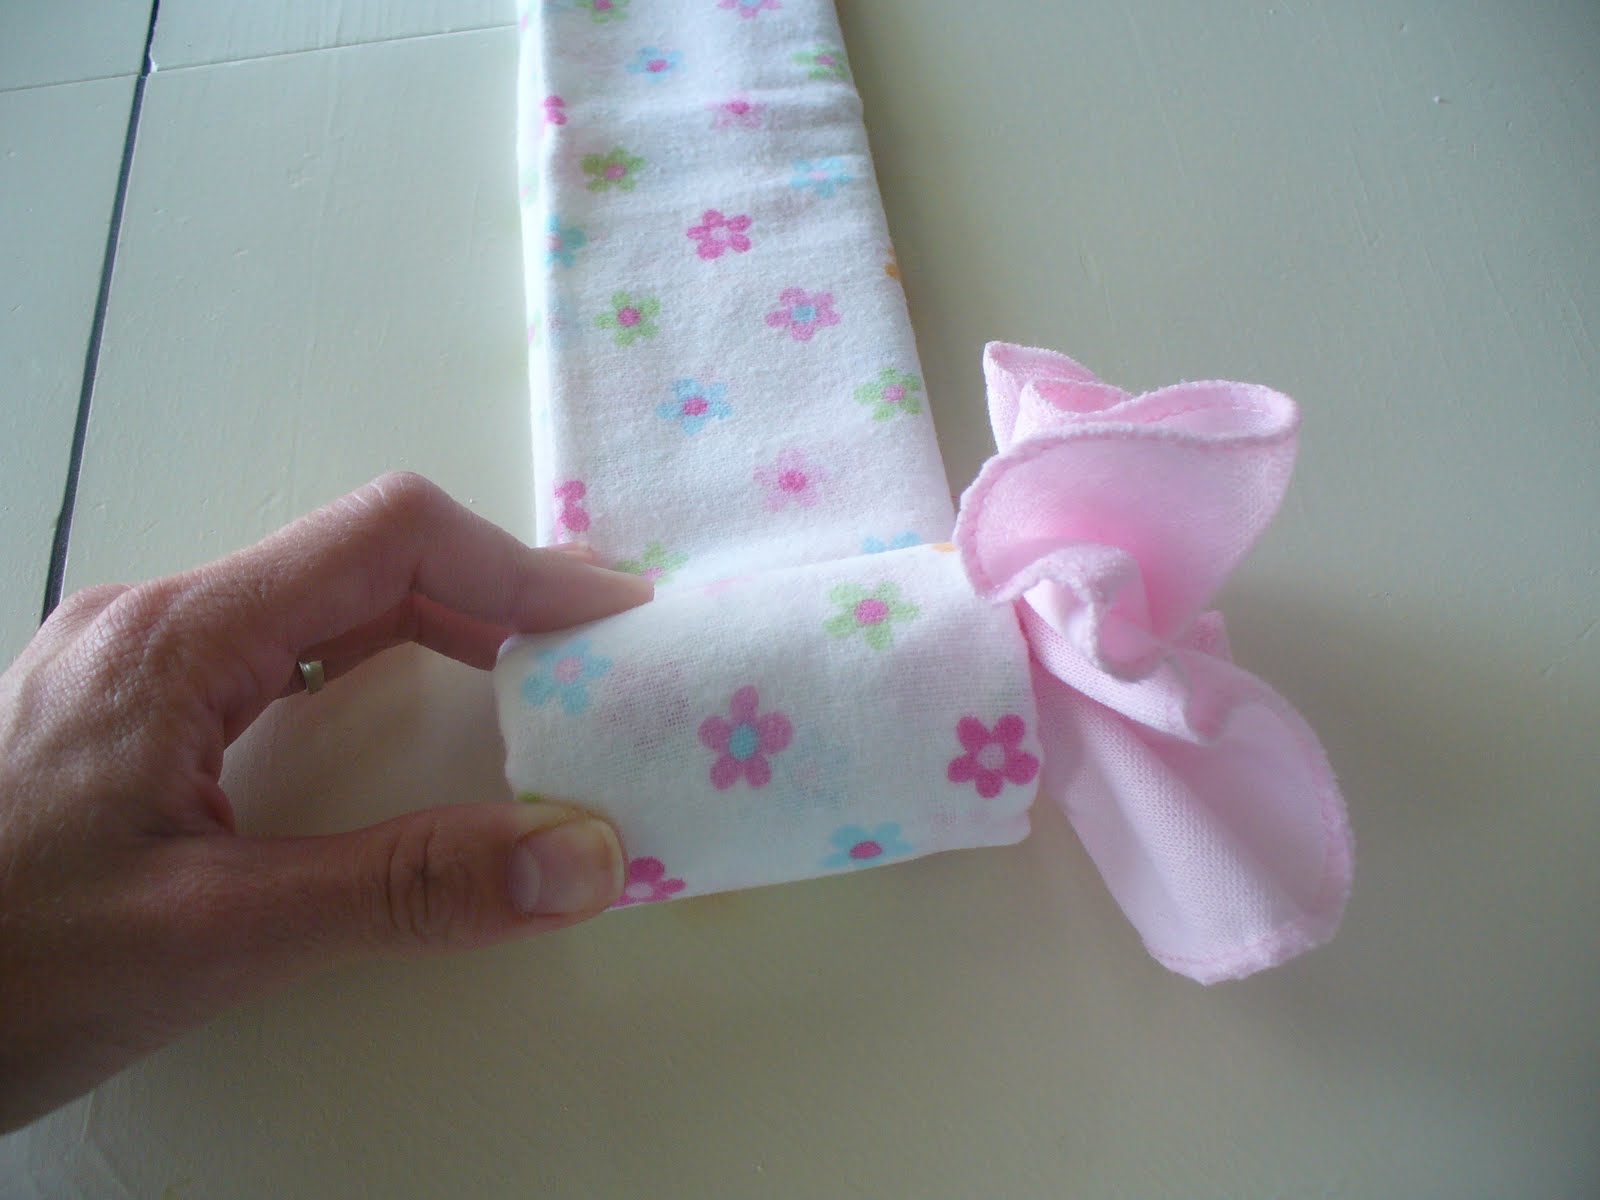
 Love this idea from My Handcrafted Home. Just think of all the possibilities! I need to raid my husbands ties. Any not worn in the last 6 months are mine :) Ok I'll ask first.


 You have got to check out this artwork from Gardners to Bergers. Beautiful!

Thanks again to everyone for linking up! I hope to see you and all the fabulous things you've been working on again this Wednesday! If I featured you today please grab a featured button. Happy creating! Enjoy!

Wednesday, August 24, 2011

Little Girl's Skirts From Men's Button Down Shirt

I've had one of my husband's work shirts (don't worry he doesn't work for that company anymore) in my laundry room for over a year with the purpose of making a clothing item for my oldest daughter. I've seen dresses and skirts made from men's button down shirts and I finally pulled it out and gave it a try! I was able to make one for each of my girls. I'm loving how they turned out! Just think of the possibilities and different colors and designs! I'm thinking I need go through our closet in hunt of more button downs to re purpose! Here's what I did.

Sorry about the photographs. I'm having problems with my dslr and using a point and shoot indoors at night is not producing the best quality of images!


This was a men's medium button down and I made a skirt for my 3 year old and 15 month old

For Deni's skirt I used the bottom half of the shirt.
  • Cut just below the pocket from one armpit to the other.

  • This shirt didn't have a straight edge on the bottom so I cut it straight across and hemmed it.
  • For the top of the skirt you will need to create a "pocket" to insert the elastic for the waist band. I used 1 inch elastic for Deni's and 1/2 inch for Capri's skirt.
  • Fold top over 1/4 inch and press. Then fold down again to create pocket for elastic and press and pin.
  • Sew top and bottom hems. Don't you love that the sides are already done for you?!

  • Sew along each side of the button strip (I don't know what to call this) This will make it all one piece and can no longer be unbuttoned.
  • Insert elastic using a large safety pin and threading it through the entire waist pocket you made earlier. Make sure to pin elastic in place before you start sewing it together. You wouldn't want to unpick the seam two times at 1:30am. Not that I'm speaking from experience or anything.
  • I added a big bow to Deni's using one of the sleeves.
  • Cut the entire length of the sleeve (I used a wider piece for Deni's and a thinner strip for Capri's)
  • Sew strip right sides facing together and making a tube
  • Turn tube right sides out.
  • Cut ends at an angle. Fold edges in and press. Sew a finishing edge.
  • I chose to hand stitch the big bow on Deni's skirt.

Toddler skirt

Baby girl's skirt
  • For this skirt I had to improvise. The shirt had a logo on it so I had to cut it out and therefore had side seams to sew and the seams are in different spots not the side. There is one about and inch away from the button strip in the front and one in the back. I chose to have the button strip off to the side instead of down the center.
  • I also had to add the ruffle on the bottom to make it longer. To do this I cut 2 long strips (same width and as long as I could) out of one of the arms. Sew them together and then sew making a tube.
  • Pin ruffle tube to bottom of skirt and sew gathering along the way.

2 adorable skirts for free!

What do you think? I'm loving them and can't wait for my girls to wear them! Here's where I link. Enjoy!

Baby Gift Cupcakes

I saw this adorable idea on Little Birdie Secrets and put my own spin on it. Getting the essentials for a baby shower is necessary, but sometimes boring so why not make it fun! You could use just about anything to make them. I've used onesies, burp cloths, wash cloths and receiving blankets. It's so easy and so cute!


Fold receiving blanket (I folded it in half then in thirds)

Lay wash cloth over your hand while making a fist

Push center into hand

Top view of wash cloth

Place at one end of blanket and start to roll

Continue rolling to make cupcake

Place in coffee filter and add ribbon. I usually wrap 4 together in cellophane with a big bow around it.
Isn't that such a cute idea! Wouldn't they be great to use as a baby shower decoration too? Thanks for visiting! Enjoy!

Check out the link parties I link to!

Show and Share {2}


Ok friends it's time to link up! I'm so excited for many reasons this week! I was asked by my fabulous friend Lindsay from Southern Lovely to co-host her Show and Share link party. I'll also be co-hosting with Whitney from A mommy's life...with a touch of Yellow It's an honor to be able to be a part of this and to be able to work with such these amazing creative ladies! I also can't wait to see what everyone has created!

Here are the rules:
*Link to a specific post--not your home page, no giveaways, or no etsy shops
*Link something you've done in the last month
*Follow me & my co-hosts Lindsay and Whitney
*Post our buttons on your blog so everyone can join in the fun
*Visit & comment on at least TWO other links posted
*Come back to see if you've been featured!


Southern Lovely 


Let's get the party started!!!! Enjoy!


The Versatile Blogger Award

How cool is this!!!! I'm so freaking excited right now you don't even know! It's almost 1am and I'm so dang tired! Hubsters is out of town all week...just me and the girls and that's tiring enough and I've been up late sewing the past couple nights (can't wait to share the project) but I'm so excited I just need to share this!!! I've just been given The Versatile Blogger Award by Jacque from Jacque's Soda Parlor and Christy from Christy's Cuties. This day just keeps getting better and better! I reached 100 followers, I had 1848 page views today and I now I've been given this award by some amazing talented ladies! Thank you so much to everyone for supporting me!


After accepting the Versatile Blogger Award, the blogger must:

1. Thank the person who gave the award and link back to them in your post.
2. Share seven things about yourself
3. Pass this award along to 10 recently discovered blogs

7 Things about me.....
  1. I had corrective surgery for scoliosis when I was 19 years old and have 2 metal rods fused almost the entire length of my spine.
  2. Daffodil's are my favorite flower...my husband has never given me any
  3. I love doing workout videos at home...in my kitchen :)
  4. Another place I get to create is at the dance studio. I grew up training in classical ballet and recently (3 weeks ago) started teaching again at my daughter's dance studio. Best part is my daughter is in my class and I get to watch her!
  5. I rode in the MS Tour for multiple sclerosis...75 miles on my bike in one day. Crossing that finish line was a huge feeling of accomplishment!
  6. I've super glued my fingers together...that was so not fun to try and undo!
  7. I am a convert to the The Church of Jesus Christ if Latter-day Saints. I was baptised when I was 20 years old and I'm very, very grateful to have the knowledge, peace and comfort the gospel brings into my life.
Visit these fabulous blogs I've found!
Southern Lovely

Monday, August 22, 2011

{100} Followers

Hello friends!!!! I'M SO EXCITED!!!! My Lil Pink Pocket has reached one hundred followers! {100}!!!! {this is me doing a happy dance} Thank you, thank you, thank you for following me and supporting me on my creating journey! I couldn't do it without all the nice comments and words of encouragement from you! Hope you're enjoying this blog as much as I am! I know there's more people visiting out there so join in the fun and click to follow!

Also more exciting news! I'm co-hosting a link party with my fabulously talented friend Lindsay at Southern Lovely on Wednesday. Come party with us and link up your fabulous crafts, recipes and anything else you've been up to! Hope to see you there! Enjoy!

Tuesday, August 16, 2011

Lima Bean Wreath

Hello there! So I've been wanting a larger version of my small turquoise lima bean wreath (original idea came from here) I've had all these ideas floating around in my head for this one. I wanted this one to be more versatile so I chose to paint it Krylon Ivory. I can change the ribbon and add different embellishments to change it up for the different holidays. Enjoy!


Here's what you need
  • 12 inch styrofoam wreath - I picked mine up at Roberts and used a 40% off coupon so it ended up being around $3.75
  • baby lima beans - 1 16oz package
  • hot glue gun and glue sticks - had on hand, I used 15 small 4 inch glue sticks
  • Krylon Ivory glossy spray paint - had on hand
  • ribbon - had on hand
  • initial - I was going to make my own, but found this one at Hobby Lobby for just over $3.
Start by gluing around the edge of the wreath on the outside and inside circles. The beans have a flat edge so I glued those to line up with the edge of the wreath. You'll see this in the picture below. Do this also on the outside circle of the wreath.


Continue gluing beans to completely cover the wreath. For this wreath I really tried to not overlap any beans, but to make sure all beans lay completely flat. Turn on a good show or some music and keep gluing. Here's how mine turned out. Absolutely love it!


Linking here.

Sunday, August 14, 2011

I'm back!

Hi friends! Last week was horrible to say the least! My family caught an awful stomach bug. I know what you're thinking...In August? Yes in August! I ended up in the hospital on Friday night to get an IV and rehydrated because I could not keep anything down. It's horrible when you're kids are sick and you have an endless pile of laundry covered in throw up and your cleaning it off the carpet, couch and their favorite blanket and when they are itty bitty ones like my 15 month old that doesn't understand why she feels so crappy. It's even worse when it's you on the couch not able to move and you have to depend on others to care for your family. I'm so grateful that I live so close to family and that my fabulous mother and sister-in-law watched my girls for me. I'm happy to say that we're all better and praying that my husband doesn't get it.

Check back for a fun project! I'll probably get it posted within the next couple days.

Monday, August 8, 2011

Paper Cupcakes

First I have to appologize for the horribe photos! These turned out so cute and the photo do not do them justice!


 For my baby's first birthday party we had a cupcake birthday. I made these super cute cupcakes in all sizes and put them all over the house for decorations. They were super easy and didn't cost me anything. I had all of the supplies in my stash of craft stuff.

Here's what you need:
Tissue paper for frosting
skewers or dowels
yarn
ribbon
cardstock

The instruction size measurements are for the cupcakes in the photo.
  1. Using a 12x12 sheet of cardstock. Cut in half so it's 6x12. Score paper every 1/2 inch and fold accordion style. Glue both halves together to make it into a circle. This is the liner of the cupcake.
  2. For the frosting your going to make tissue puffs. You can find my tutorial to make those here. Attach the tissue puff frosting with a few dabs of glue to the inside of the liner you just made.
  3. For the candle use skewers or dowels as the base. The flame is gold ribbon folded in loops and wrapped around the top of the dowel and secure with glue. Then wrap yarn around 3/4 of the dowel and stick it in the cupcake.
That's it! If you're stopping by I'd love it if you'd follow me and leave a comment to let me know you were here. Enjoy!

Linking to these parties.

Friday, August 5, 2011

Giveaway at Southern Lovely

OK peeps my friend Lindsay at Southern Lovely is doing an awesome giveaway on her blog through August 12. She is absolutely fabulous and even if you don't want to enter the giveaway (which hello you totally should) you need to check out all the fun projects she's doing! And if you haven't clicked the Join This Site button on the side DO IT RIGHT NOW! :) Thanks so much for your support in all I'm doing! Enjoy!

Thursday, August 4, 2011

Piano


Please click to follow my blog and leave a comment to let  me know you were here! Thanks so much for visiting!

A couple years ago we got this beautiful piano handed down to us. We've tried to track down how old it is, but there is no date. The only thing we can go off is the design carved into it which would make it around 130-140 years old. It was in my grandma's home and about 20 years ago she dropped it off at my aunt's house and it sat in their garage since. I have always wanted a piano in my home and was so excited when my aunt offered it to me. It was a little scary when we uncovered it. It had 20 years of dirt and grime and had been bumped with the car quite a few times. The keys were originally done in ivory, but most of it had come off and the black keys were very faded and scratched up as was the rest of the body, but it sounded beautifully and only needed to be tuned. We had it moved for us. This thing is heavy and even with six adult in good shape men they were still struggling. I wanted to keep the piano it's natural color and even leave the scratches and dents. I think that's part of what makes it so beautiful and shows it's age. We gave it a good cleaning with warm water and vacuumed it all out. We sent the white keys to be redone and put a new coat of spray paint on the black keys. We used Mohawk Scratch-Off furniture polish over the entire piano. This helped to cover and blend the scratches as well as give it a shiny polish. The bench was in very bad shape. It had been broken in many places and really looked unsalvageable. My husband wanted to throw it away, but I was adamant that we keep it. I wanted the original bench with it, but to be honest I wasn't sure if it could be fixed so it sat in our basement. In the photo you can see that the bench has been restored. It is the best present that my husband has ever gotten me! I was so excited when he brought it home...I didn't even know it was missing! I'm so glad I didn't let him throw it away! It turned out so beautiful and is sturdy. The person that restored it did an amazing job!Also my grandma had upholstered the top and when I went to recover it I found that it was beautiful underneath and decided to leave it as it was. I absolutely love having this piece of furniture in our home and that it brings history and reminds me of my grandma! Enjoy!
*UPDATE August 10: Thanks to a fabulous reader I was able to track down some information about my piano. If you'd like to read more about it click here. Then click on the first of the two catalogs then on pages 12-14. The last catalog it is in was in 1912 so we know that it is at least a century old. I'm so grateful to those that stop and leave comments here especially that lead to so much information. Thank you thank you thank you!
Related Posts Plugin for WordPress, Blogger...