Google Analytics Tracking Code

Showing posts with label Crafts. Show all posts

Saturday, June 23, 2012

Baby's Room Reveal

Our little guy's room is done! Hooray! I absolutely love how it turned out! My husband even loves it and I've found him in there just relaxing in the chair :) Not quite sure what you'd call the theme, but I call it Rustic Beachy Nautical. Yeah I know beachy is not even a real word, but that's the best I could come up with :) Stay tuned for posts about all the DIY projects: compass pillow, striped pillow, vintage canvas map, number canvas, oars upgrade, twine initial, faux basket liner and bedding. Enjoy!


DIY Compass Pillow

DIY Vintage Canvas Map

DIY Number Canvas

DIY Oars and Twine Initial


3 Tier Server

Well I'm finally getting around to posting the gifts I made for Mother's Day! I've been spending as much time with my girlies as possible and doing projects like crazy getting things ready for our little guy...by the way he's scheduled to arrive in 9 days, but have been so lazy about posting on the blog! Forgive me? I hope so! So let's get back to the post! These are so easy, so cute and were a huge hit! It took a trip to the dollar store for 2 glass candle stick holders and 3 plates. Combine that with E6000 glue and you're ready!

3 Tier Server

  1. Clean and remove all stickers from plates and candle ticks. Let completely dry.
  2. Glue candlestick bottom to bottom of plate. It should look like this:
      
     3. Repeat step 2 and let those dry overnight.
     4. Glue plates so it stacks 3 tiers high. It should look like this:


     5. Put it in a safe place and let it dry overnight.

And you're done my friends! Simple right? YES! Even my husband loved it and asked if I was making one for us :) of course I was! You may have noticed it on my buffet table when I shared that makeover with you. It was a huge hit and would also make a great gift for a wedding or birthday!

Enjoy!


Tuesday, January 31, 2012

Homemade Valentines

This year I decided to do homemade valentines with my daughter. They were so easy and turned out super cute! I let her pick out the paper she wanted (from my way to large of a stash). I made a stencil by folding a piece of cardstock in half and drawing a heart so the point hung over the edge of the fold and when cut out it unfolds to look like a butterfly. For her class at school we got little tubes of bubbles and candy spree for my dance classes and attached them to the center to look like the butterfly body. This would be a way fun activity for older children to do. They could cut out their own butterfly hearts and decorate them and attach the candy. Super easy and way fun! Enjoy!


Saturday, November 12, 2011

Advent Calendar

I love this time of year! We've been listening to Christmas music and getting out Christmas decor. (We don't have Thanksgiving at our home if we did my Christmas decor would not be coming out yet) Contrary to what people may say I'm not forgetting or overlooking Thanksgiving. We love Thanksgiving at our house...lots of yummy food, spending time with family and a day to spend remembering all that we have to be grateful for. Thanksgiving and Christmas go hand in hand for me. There's not a better way to start the Christmas season than to be reminded of what we have in our lives. I love the spirit and excitement that Christmas brings. By the time the week of Thanksgiving rolls around I want to be able to enjoy the holiday season and that includes my Christmas decor. It takes a lot of time to put up all those decorations and I don't want to have to worry about when we're going to have the time to do it so we get started early. The Christmas season is also a time for traditions and today I'm going to share one that I started with my own little family.

This is our advent calendar and countdown to Christmas, but instead of putting treats or prizes inside we do a special activity together as a family each day. I have a jar full of slips of paper with different activities on them to choose from. Each days activity depends on what we have going on that year or in some cases what the weather is like and some days we do multiple activities. (for example on a snow day we build a snowman and
make snow angels). At the end of November I look at the calendar and see what we've got going on for the month of December and put those activities in their box first. This year I knew when we had my side of the family Christmas party (which lasts all day long) so that is our activity for that day. It's supposed to be fun...not stressful! Also some of the activities will change as my children get older. This is something that is for everyone and can be adapted to every family. My oldest daughter gets so excited to open a box each day and see what we'll do together as a family.


Here's what you need to make it:
24 paper mache boxes in an assortment of sizes. The sizes of mine are 2"x2", 2.5"x2.5", 4.5"x3.5", 4.5"x4.5"
magnets for each box. I use the small silver circles that are really strong.
craft paint and brush
variety of numbers (different shapes and sizes) I used stickers, rub-ons and chipboard
different embellishments like jewels, paper cutouts and chipboard
modge podge
magnet board
  1. Arrange boxes in the order you like. Then choose what color each box will be and paint all boxes and lids. Let them completely dry.
  2. Put numbers on each box and embellish.
  3. Apply a coat of modge podge for protection.
  4.  Attach magnets to each box. The larger boxes I used 2.
  5. Fill with your slips of paper.
Here is a list of ideas!
Read the about the birth of Christ in the bible.
Read a Christmas book.
Make a paper snowman.
Go Christmas caroling.
Go see the live nativity.
Wrap Christmas presents.
Make muffins.
Make and decorate gingerbread houses.
Go see Santa.
Learn to play a holiday song on an instrument.
Take a moonlit walk in the snow.
Invite family or friends to have a sleepover.
Cuddle under a blanket.
Learn to say “I Love You” in 5 languages.
Go ice skating.
Write 10 things you’re thankful for.
Write down the 10 best memories from the past year.
Attend a holiday concert.
Go see the nutcracker.
Take a ride in a horse-drawn carriage.
Share your favorite holiday memories.
Write down your favorite traditions.
Write down traditions you want to start with your family.
Bake Christmas cookies.
Go see the lights at temple square.
Ready a book by the fire.
Watch a Christmas movie.
Watch family videos.
Have dinner by candlelight.
Make breakfast food for dinner and eat in your pajamas.
Deliver neighbor and friend Christmas gifts.
Cut out paper snowflakes.
Make popcorn string.
Make cheerio string.
Make candy cane reindeer.
Take a ride to look at holiday lights and decorations.
Watch the snow fall.
Make reindeer puppets.
Build a snowman.
Eat snow.
Go sledding.
Make snow angels.
Write Christmas cards.
Write a letter to Santa.
Make a paper Christmas tree.
Make hot chocolate.

Enjoy!


*Make sure to check out the parties I link up at!

Thursday, October 27, 2011

Eyechart Canvas

A few months back I found an awesome FREE website to make custom eye charts. You type in the text you want and it creates it for you. So AWESOME right? At that time I was working with the other fabulous young women leaders in my ward on our young women in excellence program. I am a member of  The Church of Jesus Christ of Latter-day Saints and you can find out more about it here or by emailing me. I was in charge of the take home gift for the girls and our theme was "Become Something Extraordinary". As I was typing different text to fit perfectly on the eye chart I decided to enter in the theme and it fit perfectly! You seriously have no idea how excited I was! I have been so excited to share this with all of you!
  • To create your eye chart click here. Or use any photo print you want.
  • Print eye chart in desired size. We decided on 8x10 and printed them at Costco.
  • You'll also need a canvas, modge podge and foam brush.
  1. Cover your work area with a drop cloth, newspaper or whatever you have on hand.
  2. Cut photo to exact size of canvas. You will want the edge of the print to be flush with the edge of the canvas.
  3. Pour a generous amount of modge podge directly on canvas and use foam brush to spread and even layer on entire canvas being sure to go all the way to the edge. Brush the glue from the center towards the edge so you don't get globs of glue running over the edge of the canvas.
 

4. Press print on canvas firmly. 

5. Set aside and let it completely dry.
6. Once the canvas is dry you will put another layer of modge podge over the print using a foam brush. Make sure to spread the glue using long even strokes going from top to bottom.


7. Let canvas dry completely.

Not here's the lame part...I totally forgot to take a pretty picture of the final outcome! Take my word for it they were super cute!

There's so many different options of things you could create using the eye chart maker. Don't you think it would be such a cute personalized baby gift? Or a personalized wedding gift? Here's a couple I came up with.


Now go create your own! Enjoy!


*Check out these awesome parties I link up at!

Thursday, October 20, 2011

{2 x 4} Mummies

Hello friends! I had to add just one more Halloween project for this year :) I've seen different versions of mummies this year and decided to make my own. I wanted to use what I already had so here's what I came up with.


Here's what you'll need:
  • Any scrap wood you have laying around. I used 2x4's left from when we tore down a wall in our kitchen last February.
  • Scrap fabric. This was left over from curtains in the nursery. I cut the strips about 1 1/2 inches thick and as long as I could.
  • Googly eyes
  • Hot glue and glue gun
  1. Wrap fabric vertically around wood and secure with a dab of glue at the end.
  2. Wrap fabric horizontally around wood. Tie strips of fabric together to create the bows and knots.
  3. Add googly eyes with hot glue.
And you're done! This project seriously took about 30 minutes from start to finish...and that's with kids doing projects at the same time...it was that easy! Enjoy!

*Linking up to these amazing parties!

Thursday, October 13, 2011

Black and Silver Pumpkins

Remember last week I showed you my Halloween decor and said I wasn't finished? Well I gave those orange dollar store pumpkins a makeover. Here's what I did:
  • Cut stem off the pumpkins
  • Find a new stem to use (I used sticks found in my front yard)
  • Spray paint pumpkins and stems silver and let them dry completely
  • Polka Dot Pumpkin - using a glue stick lid press it onto the pumpkin just enough to make a circle outline. Paint each circle with craft paint. I didn't have any small brushes so I used a q-tip.
  • Diamond Pumpkin - Draw diamonds on with a marker and then paint with craft paint and foam brush.
  • Striped Pumpkin - Paint every other section of the pumpkins with craft paint and foam brush.
  • Initial Pumpkin - Spray paint thumb tacks black. Once dry stick in pumpkin making your initial.
  • Hot glue new stems in place and add ribbon.
  • Easy easy easy! You're done! Enjoy!


Friday, October 7, 2011

Halloween Decor

Happy weekend friends! It's officially winter here in Utah! OK it's not that bad, but we went from 80 degrees and sunshine last week to 50 degrees, snow covered mountains, clouds and lots of rain this week! Besides hating to be cold I do love this time of year! I love scarves and boots, but most of all I love the holidays and decorating for them! And it gets better and better over the next couple of months! Holiday decorations are for me, but it's also for my kids to enjoy. For that reason I chose to go with a black, bright purple, orange and green color scheme when I started making items a couple years ago. This year I added the pieces on top of the piano. I had everything on hand to make it which is a huge plus. So here's my Halloween decor right now, but I've seen so many great things this year I may add more :)


I made the Halloween blocks a couple years ago...It's what started my color scheme :)
You can see my post about the {2x4} Pumpkins here. I've been meaning to post about the jar with the green balls in it. All items are from Dollar Tree. It's a vase and candle stick holder glued together. I wrapped styrofoam balls with green yarn and secured with a dab of craft glue as I was wrapping.


 For this display I covered books I had with scrapbook paper I already had. I used tulle and ribbon wreaths on the pottery and the pumpkins are from the dollar store.I still need to paint those and dress them up!

 Here's a picture of the tulle and ribbon wreath when it's hanging up. I originally made these to go somewhere else, but I needed them on the piano display. These were super easy! I used a foam wreath form from the dollar store and tulle and ribbon that I already had on hand. Wrap ribbon around wreath form to cover it completely. Then tie strips of tulle and ribbon alternating.

 Pumpkin lights tied up with ribbon line the railings.

Here's my Halloween Countdown wall hanging. I'm getting ready to fill it with Halloween treats, prizes and fun activities. We can't forget our pumpkin head. He giggles and says Halloween phrases. Super cheesy, but the kids LOVE it! Enjoy!
Sunday, September 25, 2011

{2 x 4} Pumpkins

Well we are officially ready for Halloween at our house! I love this time of year and always get so excited pull out my decorations! I spent last week making new pieces to add to my decor and arranging it to the way I want it. I'll share those pictures sometime this week! But tonight I wanted to share a super easy cute project! I made these last year at a craft night with some friends. My super cute neighbor hosted it and came up with this pumpkin project.


Here's what you need:
  • any kind of wood you want to use: 3 blocks for small pumpkin, 4 blocks for large (small pumpkin is 5 in tall, large is 7 in) The blocks do not need to be smooth. As you can see from the photo mine were very imperfect, but that's what I like so much about them!
  • orange paint
  • stain
  • dowels for stem
  • ribbon and wire
  1. Paint wood blocks orange. You don't need to worry about painting the bottom or the sides that you won't be able to see. Make sure they are completely dry before adding stain.
  2. Stain dowels and wood blocks with foam brush or paper towel. For the pumpkin blocks I painted the stain on and wiped off with a paper towel leaving most of it in the cracks and dents.
  3. We used a nail gun to attach the blocks together. You could also use liquid nails. Just FYI hot glue will not work :)
  4. Hot glue on stem.
  5. Add ribbon.
  6. Twist wire around a pen or pencil and hot glue end in the ribbon.
And you're done! Super easy and very inexpensive! Enjoy!

Wednesday, September 21, 2011

Halloween Countdown

I made this last year for my girls and it was a huge hit! It was a fun way to countdown to Halloween. I put little treats and fun little toys like a pumpkin flashlight, mummy suckers, stickers, spider rings, sparkly pens and pumpkin decorating kits. I need to get going on my shopping to stuff it for this year! Enjoy!

Here's how I made it:
  • Decide how big you want it and how many pockets you want on it (mine has 15 pockets)
  • Sew black cotton in a big rectangle. Don't forget to add the ribbon at the top for hanging. I also added ribbon along the bottom for decoration.
  • Cut felt for pockets.
  • Stitch felt pockets on around both sides and bottom leaving opening in the top. I used a decorative stitch to dress it up.
  • Add embellishments to each pocket.
  • Hang from a fun bright witches broom.
  • Fill with treats and toys and enjoy!

Wednesday, August 24, 2011

Baby Gift Cupcakes

I saw this adorable idea on Little Birdie Secrets and put my own spin on it. Getting the essentials for a baby shower is necessary, but sometimes boring so why not make it fun! You could use just about anything to make them. I've used onesies, burp cloths, wash cloths and receiving blankets. It's so easy and so cute!


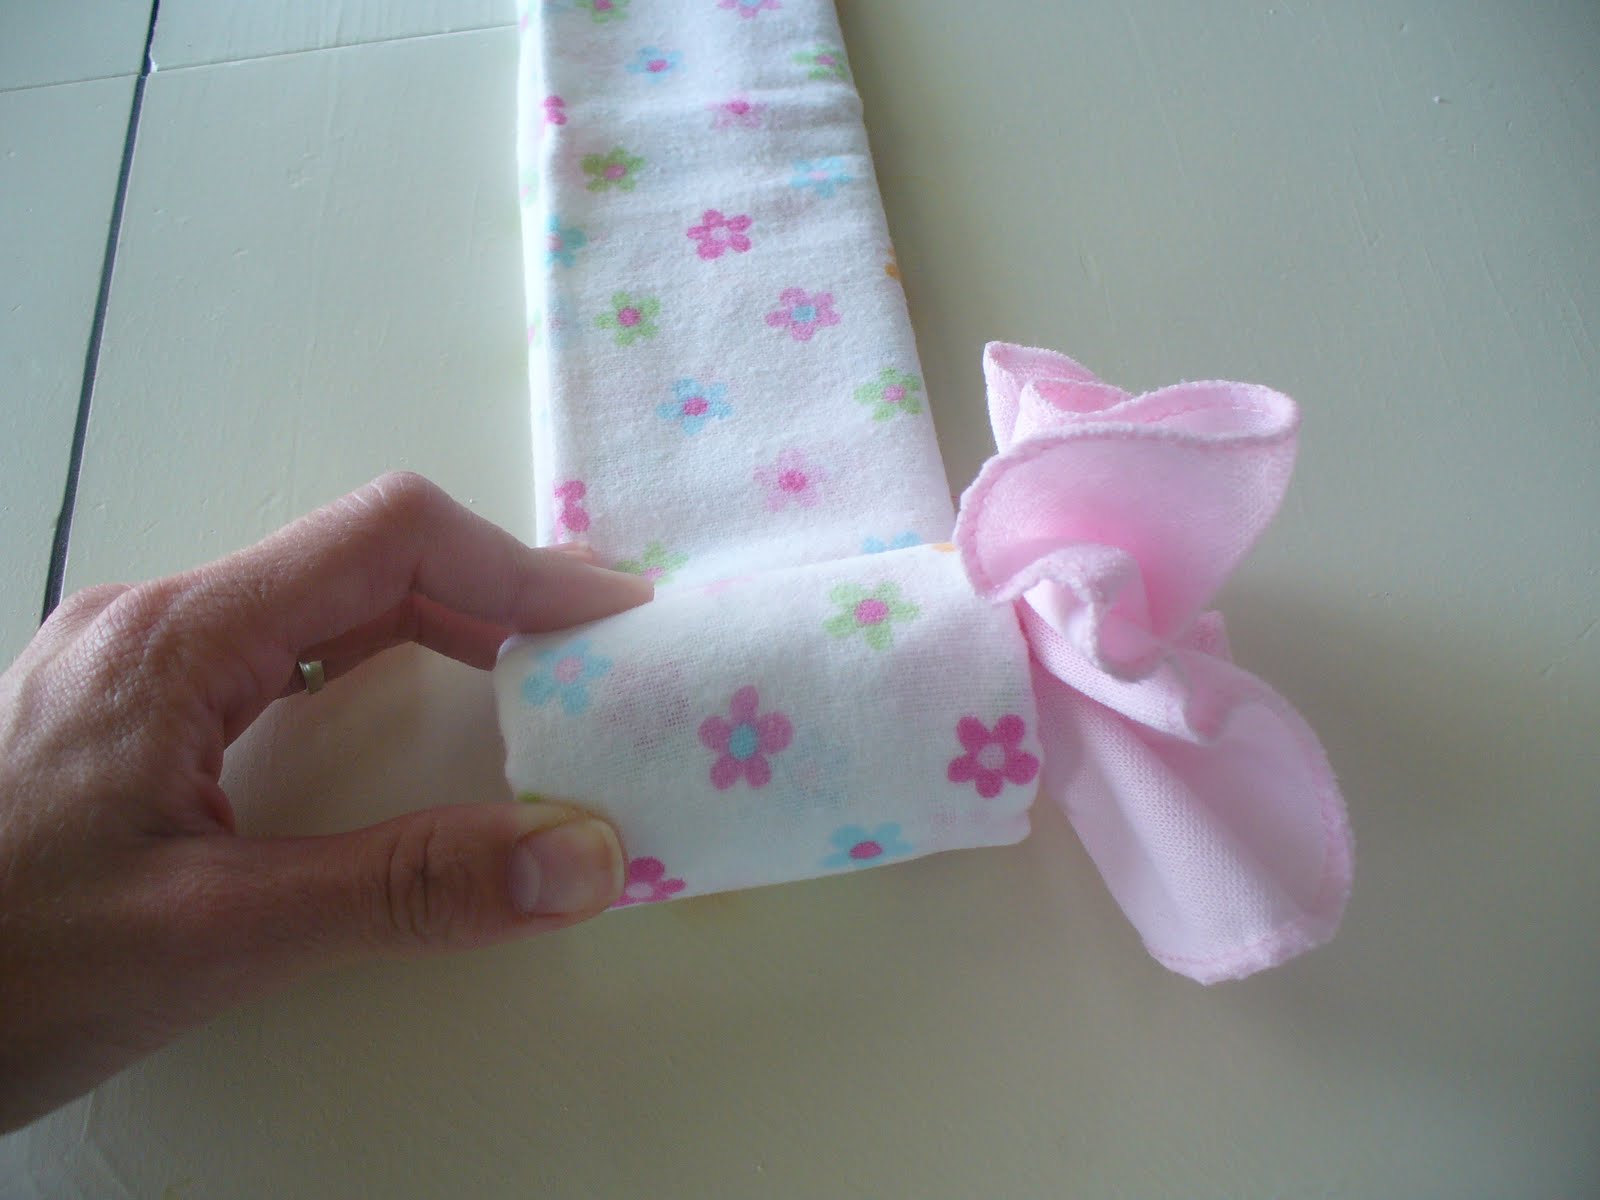
Fold receiving blanket (I folded it in half then in thirds)

Lay wash cloth over your hand while making a fist

Push center into hand

Top view of wash cloth

Place at one end of blanket and start to roll

Continue rolling to make cupcake

Place in coffee filter and add ribbon. I usually wrap 4 together in cellophane with a big bow around it.
Isn't that such a cute idea! Wouldn't they be great to use as a baby shower decoration too? Thanks for visiting! Enjoy!

Check out the link parties I link to!

Related Posts Plugin for WordPress, Blogger...